Thursday, November 16, 2023

Cramming for an Astrophotography Opportunity

Shira and I have a trip coming up where I should have the chance to shoot some amazing night sky pics. While I've done some research on the topic before, I've never put this into practice. With time quickly running out, I wanted to take whatever steps I could to improve my chances of getting some keeper shots.

To YouTube!

First up, I headed over to YouTube to arm myself with the latest information. In my mind, there are broadly two types of night sky photos to capture: fixed images and star trails. It turns out that both sets of images can be created the same way: capturing hundreds of relatively short exposures and then stacking them together to either form either a static image or star trails.

This tutorial in particular walks you through every step of the process, from preparation, to image capture to post processing. At nearly two hours in length it's a lot to take in, but so worth it. If I have any success at capturing photos in the field, it will because NebulaPhotos got me there.

To Amazon!

Fortunately, the only new hardware I'd need is an introvelometer. This device plugs into your camera and allows you to capture N photos with M delay between each one. It's perfect for capturing thousands of photos of the night sky. It's also handy for time lapses and other photo projects. And, at $20, it was surprisingly affordable.

I thougt I might need a star tracker to have the camera rotate at the same rate as the Earth to avoid un-wanted star trails. But, all of this can be accomplished in post processing.

To Emacs!

To increase the odds that I won't forget something in the field, I've updated my astrophotography cheatsheet I created a few years ago. I've folded in the information learned on YouTube and dropped the distinction between shooting with a DSLR or phone. My Samsung's S22 pro mode should work more or less the same as my DSLR if I want to give that a try.

You can find the source for my astrophotography chatsheet on github. Feel free to grab it and make improvements.

To The Field!

I felt it was really important to get out and do at least some primitive testing with both the camera settings and my new introvelometer. The best scene I could find given my free time for was to set up a poorly lit, sort of busy intersection. My hope was that dark scene would imitate the night sky, the headlights of cars would stand in for stars. This would be my first attempt at working with raw images. I figured any experience I got in the dark and cold would serve me well.

I spent about 10 very chilly minutes shooting outdoors, capturing two 50 photo sequences.

To The Command Line!

Now that I had some photos, I wanted to practice post processing them. This Reddit post had a suggestion for using ImageMagick's convert function to average a set of photos into one. While this is far more primitive than the astrophotography software I'd ultimately be using should I manage to capture some night sky pics, some of the concepts are the same.

My first attempt to producing an averaging shot was a bust:

$ convert -monitor cr2/*.CR2 -evaluate-sequence median output.jpg
convert-im6.q16: delegate failed `'ufraw-batch' --silent --create-id=also --out-type=png --out-depth=16 '--output=%u.png' '%i'' @ error/delegate.c/InvokeDelegate/1958.
convert-im6.q16: unable to open image `/tmp/magick-27807cFWXnZiY4WSQ.ppm': No such file or directory @ error/blob.c/OpenBlob/2874.
convert-im6.q16: delegate failed `'ufraw-batch' --silent --create-id=also --out-type=png --out-depth=16 '--output=%u.png' '%i'' @ error/delegate.c/InvokeDelegate/1958.
convert-im6.q16: unable to open image `/tmp/magick-27807i9EWII9jtzZR.ppm': No such file or directory @ error/blob.c/OpenBlob/2874.
...

The problem was that convert doesn't know how to work with the raw cr2 files my Canon DSLR captured.

I installed dcraw, which is able to convert from cr2 to other formats. While it has a great many options, a simple -T *.CR2 was all I needed to convert a directory of cr2 files to tiffs.

$ dcraw -v -T cr2/*.CR2
Loading Canon EOS Rebel T6s image from cr2/IMG_0021.CR2 ...
Scaling with darkness 2048, saturation 13583, and
multipliers 2.499162 1.000000 1.475508 1.000000
AHD interpolation...
Converting to sRGB colorspace...
Writing data to cr2/IMG_0021.tiff ...
Loading Canon EOS Rebel T6s image from cr2/IMG_0022.CR2 ...
...

Once in the tiff format, convert worked with the images. I kicked off the following command to average one of the sequences:

$ convert -monitor tiff/*.tiff -evaluate-sequence median output.jpg
Load/Image/tiff[IMG_0021.tiff]: 4021 of 4022, 100% complete
Load/Image/tiff[IMG_0022.tiff]: 4021 of 4022, 100% complete
...

As it churned, I imagined just how visually stunning the final product would be. Oh man, it was going to be legendary. When the image finished I found myself beyond disappointed:

That's what I froze my butt off for? Sure, that's the scene that was in front of me, but where are the lights of the cars and blur of the people?

I quickly realized that I got exactly what I should have expected. ImageMagick averaged all the photos, so what remained were just the parts of the image sequence that showed up most often. A car zipping through a frame or two was easily averaged out.

Thinking a bit more about this, I realized that this is actually a pretty clever technique. Say I want to capture a picture of the Lincoln Memorial, but I don't want all the tourists in frame. I can simply capture a whole bunch of images and then average them out.

Still, I was curious if I could combine the images in a way that would emphasize the presence of the cars and people. For that, I found this recipe: Create Star Trails With ImageMagick. Again, I used convert to join images, but this time I composed each image on top of each other.

$ cp tiff/$(ls tiff/* | head -1) master.tiff 
$ for f in tiff/*.tiff ; \
  do echo $f ; \
  convert full.jpg $f -gravity center -compose lighten -composite -format jpg full.jpg ; \
  done

The image while far from being a masterpiece is certainly more fun:

I still feel unprepared for this upcoming photo opportunity. But I now feel armed enough to give this my best shot!

Tuesday, November 14, 2023

Citi Open 2023 | Murray, Tiafoe and glimpse of Gauff

[Composed 8/1/2023]

The promise of the Citi Open, now technically the Mubadala Citi DC Open, is the chance to see world class tennis on a relatively tiny stage. While we were only able to squeeze in a day of the tournament this year, it more than lived up to its promise. This year we also brought along B and P, who both appreciate sports even if they aren't huge tennis fans (yet).

We Ubered to the stadium in the afternoon and had no traffic or long lines to contend with. The weather was beyond perfect, unlike previous years which were oppressively hot.

We started watching tennis in the main stadium, watching the fifth seed Grigor Dimitrov take on Mackenzie McDonald. We caught the first set tie break, where the two battled it out. And then started the second set, which Grigor pulled away in. While we watched the second set, Shira snuck off to one of the side courts to secure us a spot watching former number one Andy Murray.

Eventually, P, B and I joined Shira on the side court and watched Murray and Dan Evans take on Maximo Gonzalez and Andres Molteni. We tried to explain to P and B that they were mere paces away from a tennis great. It really is tons of fun watching doubles tennis in such an intimate setting. Ultimately, Gonzelez and Molteni won the day; but it was a treat getting to watch Murray emote all over the court during play. And Shira enjoyed pointing out that Andy's mom was in the stands just a few rows behind us.

After the doubles match we got lunch and hovered around the practice courts. We got lucky and managed to catch Coco Gauff warming up. This was one of the first time's we got to see that Brad Gilbert had joined her coaching team, and it was fun seeing BG on the court, not just in the commentating box.

From there, we made it to the night match, where we saw Francis Tiafoe take on Aslan Karatsev. Frances is essentially our local tennis star, so we're always eager to cheer him on whenever we see him. I'm sure winning his home tournament is top on his list of goals, and watching him play tonight it looked like that may very well happen. Frances entertanied, as always does, with his larger than life personality and some massive serves. Man he's fun to watch.

When we asked P and B what they thought of the experience, they were most surprised by just how casual the whole affair was. Not only are you close to the players, but they walk through the venue, among the fans to get to and from the locker room. P tried to imagine what would happen if a pro-soccer play just casually walked through the stands to a match. Yeah, not going to happen.

Friday, November 10, 2023

Make It Obvious | Graphically Annotating Images with Metadata for Easy Analysis

To analyze my DSLR usage I wanted an easy way to look at day's worth of photos and see which were taken with my cell phone and which with my Canon Rebel. The first challenge was normalizing the image capturing device and timestamp. That was tricky, but doable. Annotating the images with this data turned out to be straightforward. ImageMagick easily had me covered.

Ultimately, I settled on the following convert command. It adds a colored border based on the camera that took the photo and prints the timestamp and device in the corners. I scale the image down to 800 pixels wide to make large numbers of images easy to work with.

      convert $file -scale 800x \
              -bordercolor "$color" -border 20 \
              -pointsize 10 -fill white \
              -draw "text 800,15 '$device'" \
              -draw "text 15,15 '$timestamp'" $output/$outfile

I incorporated this command into photoassist as -a analyze. Running analyze against 6 gigs worth of photos from our 4th day in Tucson yielded a paltry 160 megs(!) worth images. The images have all had their names normalized to the format <date>_<time>_<device>.jpg. Using this convention I can see, for example, just the photos I took from 10am to 11am:

$ ls 20230709_10*
20230709_101428_s22.jpg  20230709_102534_s22.jpg  20230709_104116_t6s.jpg  20230709_104225_t6s.jpg  20230709_104510_s22.jpg  20230709_104850_s22.jpg  20230709_105050_s22.jpg  20230709_105245_s22.jpg
20230709_101801_t6s.jpg  20230709_102541_s22.jpg  20230709_104127_t6s.jpg  20230709_104229_t6s.jpg  20230709_104511_s22.jpg  20230709_104851_s22.jpg  20230709_105053_s22.jpg  20230709_105247_s22.jpg
20230709_101802_t6s.jpg  20230709_102837_s22.jpg  20230709_104139_s22.jpg  20230709_104234_t6s.jpg  20230709_104539_t6s.jpg  20230709_104854_s22.jpg  20230709_105055_s22.jpg  20230709_105312_s22.jpg
20230709_101804_t6s.jpg  20230709_102839_s22.jpg  20230709_104141_s22.jpg  20230709_104237_t6s.jpg  20230709_104549_t6s.jpg  20230709_104855_s22.jpg  20230709_105059_s22.jpg  20230709_105422_s22.jpg
20230709_101805_t6s.jpg  20230709_102843_s22.jpg  20230709_104150_s22.jpg  20230709_104259_s22.jpg  20230709_104559_t6s.jpg  20230709_104924_t6s.jpg  20230709_105101_s22.jpg  20230709_105532_s22.jpg
20230709_101810_t6s.jpg  20230709_102948_s22.jpg  20230709_104150_t6s.jpg  20230709_104327_t6s.jpg  20230709_104601_t6s.jpg  20230709_104926_t6s.jpg  20230709_105106_s22.jpg  20230709_105534_s22.jpg
20230709_101812_t6s.jpg  20230709_103541_s22.jpg  20230709_104153_s22.jpg  20230709_104328_t6s.jpg  20230709_104636_t6s.jpg  20230709_104932_s22.jpg  20230709_105131_t6s.jpg  20230709_105537_s22.jpg
20230709_101813_t6s.jpg  20230709_103543_s22.jpg  20230709_104153_t6s.jpg  20230709_104336_t6s.jpg  20230709_104712_s22.jpg  20230709_104933_s22.jpg  20230709_105133_t6s.jpg  20230709_105607_s22.jpg
20230709_101815_t6s.jpg  20230709_103849_s22.jpg  20230709_104154_s22.jpg  20230709_104344_t6s.jpg  20230709_104713_s22.jpg  20230709_104950_t6s.jpg  20230709_105139_s22.jpg  20230709_105614_s22.jpg
20230709_101816_t6s.jpg  20230709_104029_t6s.jpg  20230709_104154_t6s.jpg  20230709_104347_t6s.jpg  20230709_104715_s22.jpg  20230709_104954_t6s.jpg  20230709_105143_t6s.jpg  20230709_105617_s22.jpg
20230709_101819_t6s.jpg  20230709_104040_t6s.jpg  20230709_104155_t6s.jpg  20230709_104348_t6s.jpg  20230709_104716_t6s.jpg  20230709_104957_t6s.jpg  20230709_105144_t6s.jpg  20230709_105630_s22.jpg
20230709_101820_t6s.jpg  20230709_104044_t6s.jpg  20230709_104156_t6s.jpg  20230709_104438_t6s.jpg  20230709_104737_s22.jpg  20230709_105002_s22.jpg  20230709_105158_s22.jpg  20230709_105631_s22.jpg
20230709_102431_s22.jpg  20230709_104047_t6s.jpg  20230709_104157_s22.jpg  20230709_104455_s22.jpg  20230709_104742_t6s.jpg  20230709_105004_s22.jpg  20230709_105201_s22.jpg  20230709_105659_s22.jpg
20230709_102524_s22.jpg  20230709_104050_t6s.jpg  20230709_104159_t6s.jpg  20230709_104456_t6s.jpg  20230709_104743_t6s.jpg  20230709_105010_s22.jpg  20230709_105206_s22.jpg
20230709_102527_s22.jpg  20230709_104058_t6s.jpg  20230709_104203_s22.jpg  20230709_104457_s22.jpg  20230709_104746_t6s.jpg  20230709_105012_s22.jpg  20230709_105215_s22.jpg
20230709_102532_s22.jpg  20230709_104101_t6s.jpg  20230709_104222_t6s.jpg  20230709_104503_t6s.jpg  20230709_104822_t6s.jpg  20230709_105034_t6s.jpg  20230709_105239_s22.jpg

Using feh I can preview these images as a contact sheet:

$ feh -m -E 120 -y 160 20230709_10* -H 1000

All the photos with a red border were captured with my Canon DSLR, the photos with a blue border were from my Galaxy S22. I can also use feh to inspect the images manually:

$ feh 20230709_10*

Using these annotated images I get a much better picture (hah!) of how and to what effect I use my DSLR. Up next, I want to spend some time with these images and see if I can reach any useful conclusions.

Wednesday, November 08, 2023

Finding a Photo's Who and When | Extracting and Scrubbing Exif Data

To simplify analyzing my DSLR vs camera phone pictures, I'd like a reliable way of pulling two key pieces of metadata from a photo: the name of the capturing device and the timestamp of when it was captured) taken. A typical JPG stores this information in exif data, so it shouldn't be hard to access. Consider these four sample photos:

ImageMagick's identify command extracts exif entries with ease. Here's what I see when I run it against my sample photos and look for interesting keywords:

$ for f in *.jpg *.JPG ; do echo $f ; identify -verbose $f | grep exif: | egrep -ie '(date|canon|samsung|eos)' ; done
20230709_050311.jpg
    exif:DateTime: 2023:07:09 05:03:11
    exif:DateTimeDigitized: 2023:07:09 05:03:11
    exif:DateTimeOriginal: 2023:07:09 05:03:11
    exif:Make: samsung
20230709_055335.jpg
    exif:DateTime: 2023:07:09 05:53:35
    exif:DateTimeDigitized: 2023:07:09 05:53:35
    exif:DateTimeOriginal: 2023:07:09 05:53:35
    exif:Make: samsung
IMG_0029.JPG
    exif:DateTime: 2023:07:09 09:00:00
    exif:DateTimeDigitized: 2023:07:09 09:00:00
    exif:DateTimeOriginal: 2023:07:09 09:00:00
    exif:Make: Canon
    exif:Model: Canon EOS Rebel T6s
IMG_0045.JPG
    exif:DateTime: 2023:07:09 09:02:59
    exif:DateTimeDigitized: 2023:07:09 09:02:59
    exif:DateTimeOriginal: 2023:07:09 09:02:59
    exif:Make: Canon
    exif:Model: Canon EOS Rebel T6s

Extracting a Device Name

It looks like exif:Make or exif:Model is going to be the best source for the camera name. Focusing on these fields, I see:

$ for f in *.jpg *.JPG ; do echo $f ; identify -verbose $f | grep exif: | egrep -ie 'exif:(Make|Model):' ; done
20230709_050311.jpg
    exif:Make: samsung
    exif:Model: SM-S908U1
20230709_055335.jpg
    exif:Make: samsung
    exif:Model: SM-S908U1
IMG_0029.JPG
    exif:Make: Canon
    exif:Model: Canon EOS Rebel T6s
IMG_0045.JPG
    exif:Make: Canon
    exif:Model: Canon EOS Rebel T6s

SM-S908U1 doesn't mean anything to me, and Canon EOS Rebel T6s is a bit verbose. But mapping these values to easy to work with names requires only a  bit of trivial shell scripting:

case $make in
  SM-S908U1) echo "s22" ;;
  *T6s*) echo "t6s" ;;
  *) echo "unknown" ;;
esac

Extracting a Timestamp

On the surface, it looks like DateTime contains exactly the timestamp I'm looking for. It uses :'s instead of -'s to delineate the date, but that's trivial to fix:

$ for f in *.jpg *.JPG ; do echo $f ; identify -verbose $f | grep exif:DateTime: | sed -r 's/([0-9]{4}):([0-9]{2}):([0-9]{2}) ([0-9]{2}):([0-9]{2}):([0-9]{2})/\1-\2-\3 \4:\5:\6/' ; done
20230709_050311.jpg
    exif:DateTime: 2023-07-09 05:03:11
20230709_055335.jpg
    exif:DateTime: 2023-07-09 05:53:35
IMG_0029.JPG
    exif:DateTime: 2023-07-09 09:00:00
IMG_0045.JPG
    exif:DateTime: 2023-07-09 09:02:59

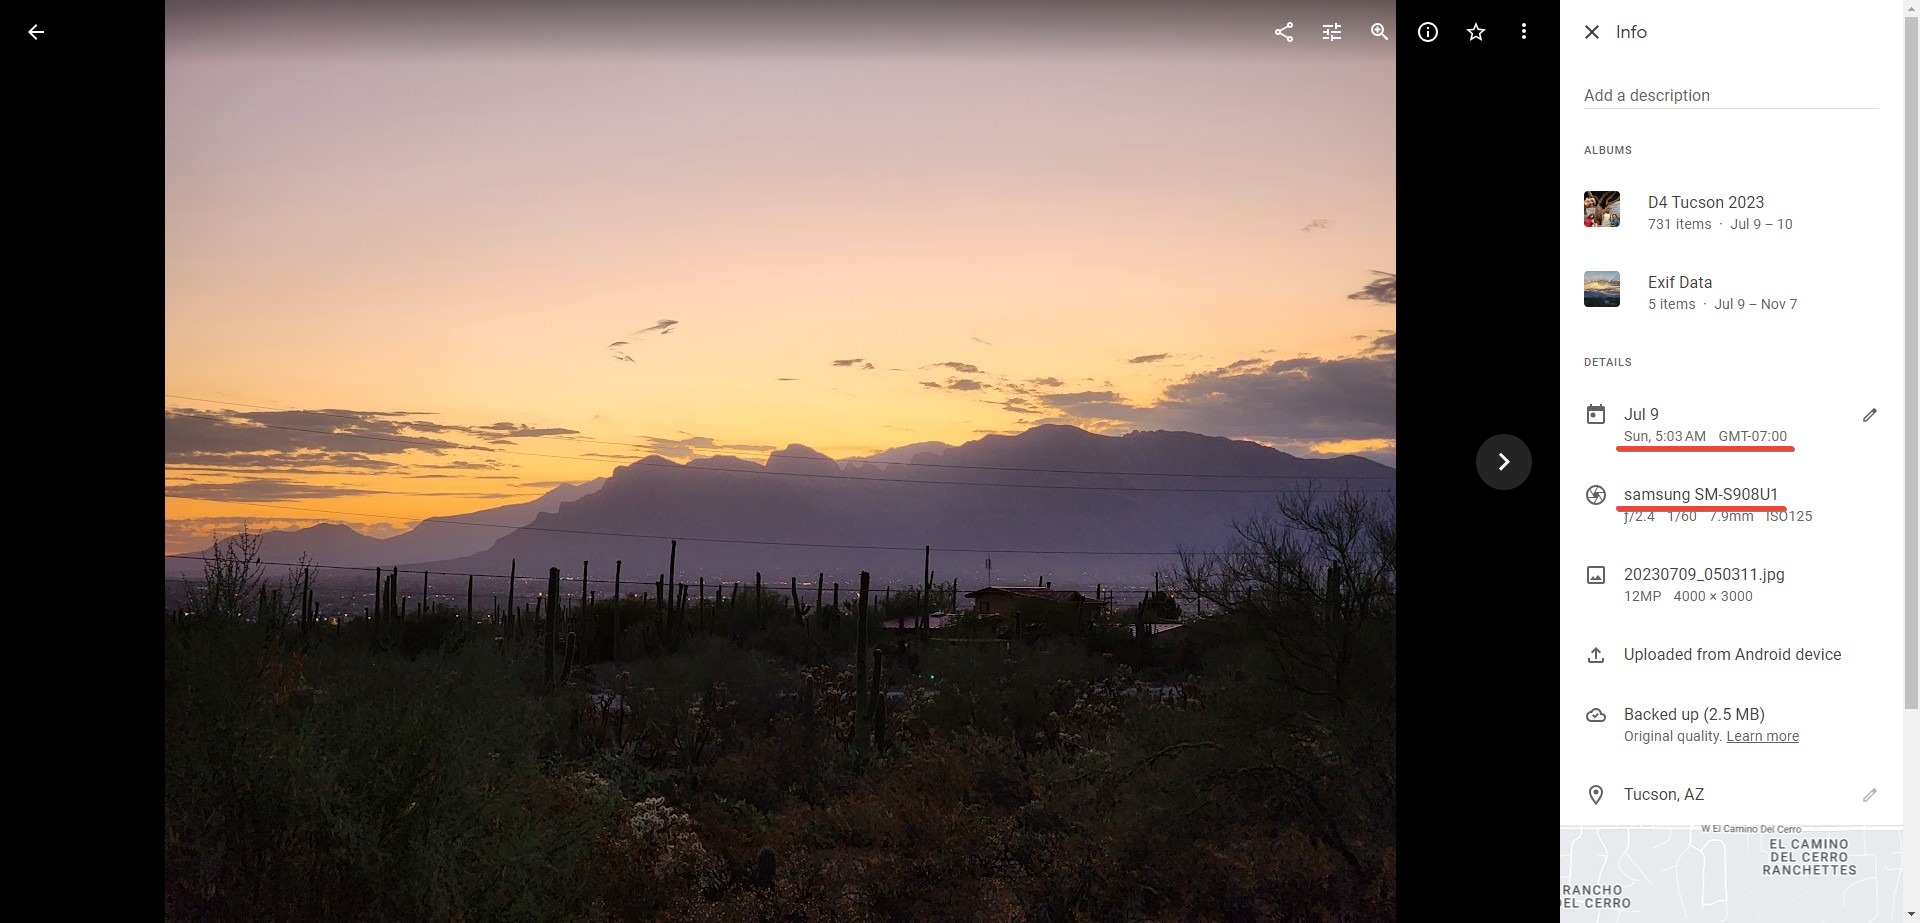
While these are all seemingly valid timestamps, there's a problem: these photos were all taken in the early morning of July 9th. Why do some have the timestamp of 5am and some 9am? Something's not right.

According to the Google Photos UI, they were all taken between 5am and 6am:

The photos from my Galaxy S22 have exif timestamps that match Google's UI. But the DSLR are pics are totally off. What gives?

First, I spent time closely analyzing the photo metadata from the DSLR's pics. I could see no timestamp that matched what the Photos UI reported.

$ identify -verbose IMG_0029.JPG |egrep -ie '(date|time|stamp)'
    date:create: 2023-11-08T06:59:29-05:00
    date:modify: 2023-11-08T03:58:16-05:00
    exif:DateTime: 2023:07:09 09:00:00
    exif:DateTimeDigitized: 2023:07:09 09:00:00
    exif:DateTimeOriginal: 2023:07:09 09:00:00
    exif:ExposureTime: 1/125
    exif:SubSecTime: 41
    exif:SubSecTimeDigitized: 41
    exif:SubSecTimeOriginal: 41
  User time: 0.210u
  Elapsed time: 0:01.329

Then I cursed out Google: how could they show me a correct timestamp on the web, but give me back a random timestamp in the image itself?

And then I remembered that I shot these photos with my camera's internal clock set incorrectly. I used a clever feature offered by Google Photos to shift the image capture time by a relative amount:

Google's almost certainly returning the original exif timestamp to me, not the one that I shifted on Google Photos. While this isn't the behavior I want, it is reasonable behavior. To deal with this, I've implemented my own time shifting logic. My approach is to describe in a text file the original and corrected timestamp for a given photo. Any other photos taken that day will be corrected by the same offset. For example, I can describe my DSLR's timestamp correction for July 9th, 2023 as:

device|date|exif_timestamp|google_photos_timestamp
t6s|2023-07-09|09:00|05:46

With this approach, I can issue a correction once and have it apply to the hundreds of photos taken on a give day.

I've packaged up the friendly device name mapping and timestamp correction logic into a shell script named photoassist. Using this script, I can now access scrubbed metadata.

$ for f in *.jpg *.JPG ; do d=$(photoassist -a device -i $f) ; t=$(photoassist -a timestamp -i $f); echo "file=$f, device=$d, timestamp=$t" ; done
file=20230709_050311.jpg, device=s22, timestamp=2023-07-09 05:03:11
file=20230709_055335.jpg, device=s22, timestamp=2023-07-09 05:53:35
file=IMG_0029.JPG, device=t6s, timestamp=2023-07-09 05:46:00
file=IMG_0045.JPG, device=t6s, timestamp=2023-07-09 05:48:59

These timestamps now agree with Google Photos and the device names are far easier to recognize and work with.

Next up, I want use this data to annotate and organize a day's worth of photos so I can clearly see what my DSLR is bring to the table.