Wednesday, February 28, 2018

Just Try It! Adventures in Bushcrafting very close to home

Lately, I've been acutely aware that when it comes to learning a new skill or selecting a piece of gear, there are four levels of awareness: Hearing It, Seeing It, Trying It and Doing It.

Consider this example: you want to buy a new flashlight for backpacking, specifically for night hiking. You need a number of competing benefits: the light should be bright, compact, have long running time and be affordable. How do you arrive at the ideal flashlight?

Hearing It. You could just head over to reddit.com/r/Ultralight and ask for a recommendation. The problem: what might be bright enough for person may not be bright enough for you. And, it's possible that the person who's make a recommendation has never used the flashlight on a night hike.

Seen It. Thanks you YouTube, we live in the golden age of seen it. With luck, you'll be able to take the recommendations you've received and watch detailed reviews on YouTube. It's not quite as nice as holding the flashlight in your hand, but it's far better than just hearing about the light.

Tried It. At this point, you've picked up that flashlight and now it's time try it out. Sure, a walk through the neighborhood at night isn't the same as a tramp through the woods, but it's still educational. You'll know at this point if the flashlight really is bright enough, light enough and long running enough.

Did It. Finally, it's time to actually use that flashlight in the woods.

The more I think about it, the more I realize how invaluable that Try It step is. Sure, the Doing It step is great, but by the time you're there, you almost certainly don't want to fail. But in the Try It step, the cost of failure is minimal.

This means that more than ever, I'm looking for ways to try stuff. Which is how I found myself sitting outside on our deck whittling a pair of chopsticks.

The other day, I realized that I'd never bother fashioning a pair of chopsticks in the field. Rather than put this on my next campout's TODO list, I though I'd follow my own advice and give it a try. So while running along Four Mile Run trail I kept an eye out for sticks that seemed appropriate for fashioning chopsticks from. I picked up two candidates:
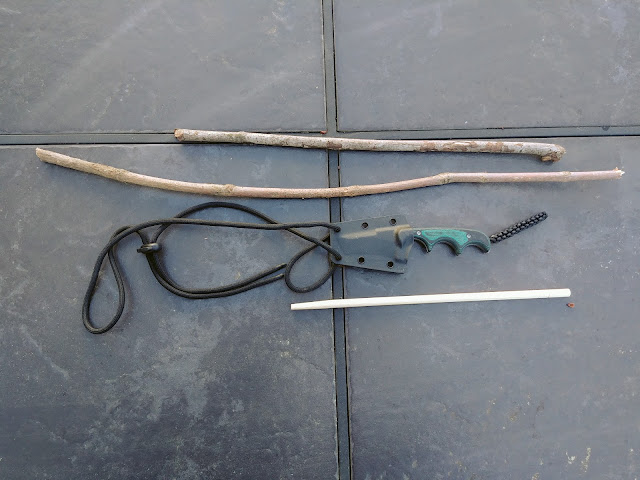
I grabbed a chopstick from our utensil drawer and used it to get an idea of length and thickness that I was shooting for. And then I whittled away.

After about 10 minutes, I had two very crudely fashioned eating instruments:
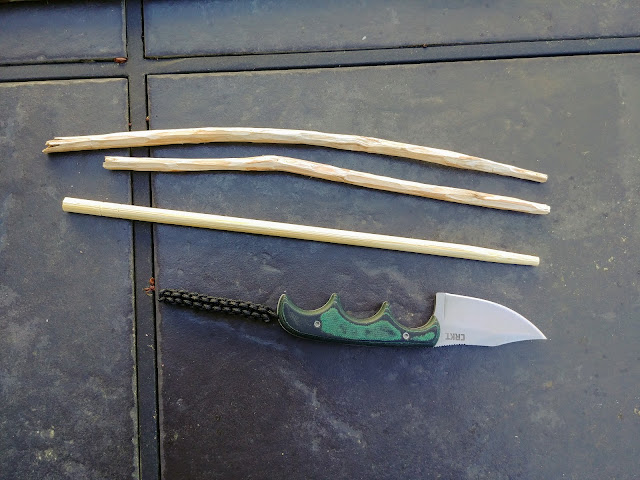
By my own Try It measure I still wasn't finished. Next, I needed to cook and eat lunch with them. So I did. I cooked up some rice noodles and broth and enjoyed slurping up lunch outside:

So what did I learn from all of this?

Field expedient chopsticks are totally usable. They take about 10 minutes to make, and will leave the hand gripping the stick totally fatigued. Most importantly, I need to keep an eye out for truly straight sticks to start with. The wonky pair I made works, but require more care to eat with.

On my next camping trip, can I leave the spork at home and rely on improvised chopsticks? Maybe. I've got at least one experience under my belt that says, go for it!

Tuesday, February 27, 2018

Fun with Fire: a Bic powered hot knife

From this video on alternative ways to light a bic lighter (useful for when you're hands are numb), I found myself on this lighter hacks video. One of the suggested hacks involved carefully attaching a paper clip to a lighter to create an improvised soldering iron.

I was curious if this hack truly worked, so I busted out a Bic, a paper clip and some Gorilla tape. I haphazardly folded the paper clip into position and taped it in place:

I fired up the Bic for 20 seconds or so and then attached a plastic yogurt container:

Like a hot knife through butter, the metal tip trivially pierced the plastic. Looking around for what else I could play with, I sliced up a ziplock bag.

I then went and grabbed some solder and tried melting it. No luck. Perhaps I need lower temperature solder for this to work?

This trick does get the paper clip hot enough to melt hot-glue-gun-glue. I grabbed some items recycling bin and confirmed that you can improvise a glue gun if need be:

How practical is all of this? Not sure yet, but being able to rig up a hot knife in a few seconds with minimal supplies shows promise to me.

The video opens with a slick hack for keeping a lighter burning continuously. It involves a using a large screw, a nut and a hot glue gun to attach everything. This works, though a simple hair band works equally as well:

But I think calling that a hack is probably being a bit too generous.

Monday, February 26, 2018

Dragiano v1.0 - Click your way to music creation

While on a run last Friday, I had an idea for interactive music generation tool. I imagined an extremely stripped down sequencer where you could draw arbitrary lines. As the sequencing head encountered the lines, a musical tone would be played. The vertical position of the line would determine the pitch of the tone. It was sort of sequencer meets violent-thermin.

Much like the thermin I intended to build this on a HTML5 canvas object.

It was only today when I went to implement this concept that I realized that a native HTML5 canvas object wasn't going to do the trick. A canvas would let me draw the shapes I needed, but lacked the ability to add and remove shapes (like the play head and sound-lines), as well as detect mouse clicks on the shapes.

Fortunately, these limitations are addressed in the very slick concrete.js library. This lightweight library makes use of multiple canvas objects to implement object layering and editability. It even uses a clever color hack to allow for hit detection.

With this library in hand, I was able to bring Dragiano to life. Here's how it works:

Click anywhere to set your first point. Now click again. The the line you just created represents a tone to play. Now hit the play button. The play head should eventually hit your line, and if all goes well, you'll hear sweet, sweet music.

Seriously, try it:

I was pleased to see that all of this works without modification on my Android device, too.

So far, I haven't been able to coax anything but screechy noise out of Dragiano. But for now, I'm just satisfied that he's functional.

Feel free to grab and play with the source code here.

Friday, February 23, 2018

7 Sounds - They're not music, but they're all mine

I've spent the last few weeks dabbling with my audio framework and it's definitely been educational. I'm not a lot closer to producing music, though I have been having fun making quirky sounds. Take this one:

A couple of times I tried to make tunes from my guesses what notes would power them. That was pretty much a disaster. Ultimately, I partially copied note-for-note this version of Super Mario Brother's Theme from Band.js and was delighted when it played correctly. This shows me that it's not my framework's fault that I can't put two notes together; it's clearly my lack of musical knowledge.

After having dabled with my own audio framework, the code for band.js is even more impressive. It's remarkable how similar our code is, even though I had different goals in mind. I guess there's only so many ways you can make an Oscillator Node generate a C note.

Here's a handful more tunes that I've authored. Like my visual poems they don't stand on their own. But they do have a similar quality of being built by experimentation, and most importantly being called a success if they come across as interesting.

It comes down to this: I may be just mashing keys on the piano, but at least I'm having fun. Grab the source code for all of this here, and go make something awesome!

Thursday, February 22, 2018

The Fannypackinator v1.0 - A Useful Failure

I find that simple cross body bags, like the Nicgid I'm currently rocking does most jobs well. It's practical and low profile.

There are some times, however, when the cross body nature of the bag gets annoying. Say I'm taking a hike, or doing something that requires more mobility, like fishing. In these circumstances, the stability of a backpack or sling bag wins the day.

Solutions to this first-world-problem range from simply transferring my stuff to the appropriate bag, to continuing my search for the perfect one size fits all bag that clearly doesn't exist.

The other day I came up with another solution, and thanks to the sewing kick I'm on, I was able to prototype it.

The idea is to create a little harness for my shoulder bag that turns into a fanny pack. Yes, the dreaded fanny pack. Although, this is more lumbar pack than 1980's fashion accessory.

Turning my bag into a lumbar pack would give me the hands free flexibility I'm after. Hikers and fisherman have already proven the value of this format. As a bonus, I could use the same harness for attaching the bag to my bike or another bag altogether.

The Fannypackinator® consists of two nylon webbing straps to support the bag and one to hold the bag and straps in place:

Here's the finished product with a belt in place for demonstration purposes:

And the project was officially a bust. The straps fit into place, which is progress. However, the generously sized belt loops cause the whole setup to hang too far away from the belt. The result is saggy mess, versus tightly fitted arrangement I saw in my mind's eye.

I think the solution is probably to sew the loops in place. However, before I start sewing stuff I can't easily un-sew, I'm going to take some time to think more about the problem.

My dreams of a rocking a fanny pack will have to wait another day. But oh, when that day comes, will it be sweet!

Wednesday, February 21, 2018

Your Next Must Have Office Accessory: A Tool Belt

The tool roll I sewed yesterday is cool and all, but for day to day use, not especially practical. Unrolling it on my desk takes up quite a bit of room. I briefly kicked around the idea of thumbtacking it to the wall, turning my tool roll into a wall organizer. And then it hit me: I'd basically crafted an apron. If I attached a strap of some sort, I'd be able to *wear* my tools.

Goodbye tool roll, hello tool *belt*!

So I grabbed some 1" webbing, a buckle and did a bit more sewing:

And check it out, here's an action shot:

I know what you're thinking: this is fun and all, but how practical is this? I mean, a tool belt for office supplies?

I'm thinking it might be quite practical. Now that I've got a standing desk, I spend most of the day, well, standing. So having various tools on my waist makes them fully accessible. I'm certainly going to give it a try.

Mark my words: tool belts for programmers are so going to catch on!

Tuesday, February 20, 2018

Loudly Organized | A DIY Tool Roll

There's just something professional about busting out a tool roll. I mean, show up with your surgical instruments haphazardly thrown into a bag, and there's little chance you'll inspire confidence. But unroll a neatly organized set of instruments, and the soldiers will practically line up for your to perform surgery on them. So yeah, I've always had a healthy appreciation for tool rolls and the like (and yes, bonus points if the kit fits in your pocket).

I don't technically need a tool roll for my job; not because I don't need tools, but because I've already got them nicely organized. However, I was looking for another easy, yet practical sewing project to cut my teeth on and making a tool roll was a natural choice.

I worked out my creation as I went: measuring, pinning, fitting the items in place and then repeating this process a couple more times.

The finished product came out surprisingly clean looking:

I punted on any sort of closure mechanism, opting for a rubber band. Though I may come back to this and see what I can come up with.

Next time I meet a client to talk about their idea, boy are they going to be surprised when I bust this bad boy out. Just like that Civil War surgeon, I shall inspire confidence through my meticulous set of instruments ready to tackle whatever gruesome task I throw at them.

Thursday, February 15, 2018

A Kosher Conundrum

If you keep Kosher, these three pictures are remarkably confusing:

For those not in the know, the outer box shows that the cookies are OU Parve. That is, the cookies contain no dairy products. The outer box also shows that the packets will have OU Parve printed on them. But the inner packets themselves, which have no ingredients on them, are marked as OU D. Where the D stands for dairy.

So which is? Are the cookies parve or dairy? Can I eat them after a burger or not?

Luckily, the good people at the OU Kosher Hotline were there to help:

Subject: Re: Giant Cookies Mystery

They are currently parave but company is transitioning to dairy

So there you have it, despite the fact that the packets are labeled dairy, the cookies are actually parve.

Oy, it pains me to think that these cookies are going to be transitioning to diary status. No word yet from the OU as to whether they are going diary because of a recipe change, or for other reasons.

Wednesday, February 14, 2018

Pick Me! Adventures in improvised lock picking.

Every so often I pick up my copy of How To Open Locks With Improvised Tools: Practical, Non-Destructive Ways Of Getting Back Into Just About Everything When You Lose Your Keys and get re-inspired to master experiment with lock picking. If you've never considered lock picking, it probably sounds quite devious, though it need not be.

With that said, the Commonwealth of Virginia doesn't take kindly to this hobby and considers just owning a set of lock picks as intent to break the law. All isn't lost though, as the point of the book is to use improvised tools.

So today I grabbed an old padlock and a bunch of possible materials to turn into lock picking tools and went to work.

15 minutes of crafting and fiddling later (which felt like an eternity!) I shocked myself by opening the lock:

This act falls squarely in the beginner's luck category. Though, when it comes to defeating locks, I'll take any success I can get.

As you can imagine, there are lots of resources on the web to help you learn this skill. And of course, YouTube is your friend. Happy picking!

Tuesday, February 13, 2018

A Desktop in the Cloud - Experimenting with Amazon WorkSpaces

Check out these pictures of two different computers in my house:

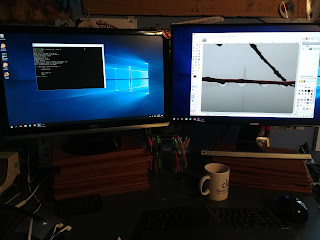
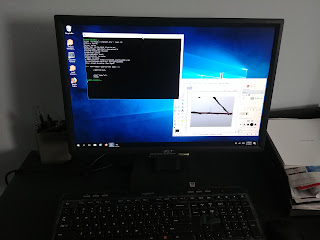
Ignoring the clutter, what you're looking at is two different snapshots of the same Windows 10 Desktop. What's remarkable about this is where the desktop is actually running: why in the cloud, of course.

Virtual servers completely changed the software development and small business game. Gone are the days of buying, configuring and maintaining physical servers. Instead, you can virtual turn them on and off at will. Curious if having twice the RAM will make your server run 10 times faster? Kick off, and ultimately throw away, a virtual server to give it a try. Need to launch multiple instances of a server? Don't bother hand configuring them, just create an image and launch as many instances as you want.

It's time for me to phase out one of my regularly used computers, and pick up a new one. And while shopping around it occurred to me that surely there must be a virtual desktop solutions like there are for servers. And of course there is, and of course Amazon AWS offers this service and of course there's a free tier to try it out. So that's what I did.

Launching a server is trivial, and so is getting access to it. I had no problem installing Cygwin and the Gimp on it.

The pics above show me running my virtual desktop instance on both my standard Windows, dual monitor environment, as well as a Chromebit Chrome OS stick. For the quick tests I ran, both performed well. As you can tell, the virtual desktop supports dual monitors, which is key. It also seamlessly handled audio in a YouTube clip.

I see that Amazon Workspaces supports taking image snapshots. With a bit of scripting, I'm confident I could trivially setup a weekly backup procedure that insured I always had access to working desktop instance.

The big question, of course, is lag. I'm writing this post on the virtual desktop and I'm not noticing any annoying lag. Though writing a blog post is hardly a way to push a computer. It's also not fair, because if I did go with a virtual desktop I wouldn't use their free 4 Gig tier, but would opt for something far more powerful. I'm fortunate to have a direct Ethernet connection to my FIOS router, which gives me solid network speeds. I'm sure this is helping in the lag department.

And speaking of network speeds, the virtual desktop has almost comically fast web access:

Even if the lag doesn't kill me, I'm sure there will be other limitations that will keep me from being able to use a virtual desktop exclusively. For example, will an AWS WorkSpaces instance grant me USB debug access to an Android device? That's probably a bridge too far. Still, a virtual desktop could be a hugely powerful tool. Especially in an environment where I don't have an IT department I can turn to, to fix whatever random issue is happening on my computer that day. AWS let me tame my server environment, man it would be great if I could do the same with the desktop experience.

Monday, February 12, 2018

A Cloud Settles over DC and a Mysterious Orange Goo

That's not a metaphor for the current administration. That's just a fact. Yesterday it got up to nearly 70°F and we had a morning full of rain. This all made for a surreal run through DC and the chance to grab some unique pics of the area.

You would think the orange gelatinous goo growing on the side of one of the trees near the Tidal Basin would be easy to identify. But alas, all my attempts to get Google to cough up an identity have failed. Any ideas what it is?

Friday, February 09, 2018

Needs More Grommets | Adventures in sewing a prototype

After I finished sewing my first solo creation, I was left with a question: how do a I add a shoulder strap to the (very simple) haversack I just made? I ended up adding grommets to the corners and using cheap carabiners to attach the strap to these endpoints. While the bag was comically funny looking, it was functional.

This got me wondering: what if I created a larger bag and sprinkled grommets at the corners liberally? I'd then be able to re-rig the bag to carry it vertically, horizontally, or dispense with the strap altogether and just attach the bag to a bike rack or other carrier. In my mind's eye this seemed like the ultimate in flexibility.

But I need not settle for imaging this. I had plenty of von Trapp fabric left, as well as a package of grommets. Why not create a prototype of what I had in mind and evaluate the idea in a more concrete way?

I essentially followed the same pattern described in the Ripstop by the Roll's belt bag tutorial, except I opted to make the bag much larger. Because this was a prototype, I skipped installing a zipper altogether. For dimensions, I went with a 7" wide, 5" deep and 10" tall bag.

You can see in the pics below how I went about constructing the bag. First, I figured out all the calculations on a sheet of graph paper (so not to scale!). Then I carefully cut and marked the fabric. Finally, I sewed the 8 seams to make the fabric into a bag:

And here's what the finished product looks like. You can see me demonstrating a few different attachment points:

So many lessons learned! Among others:

  1. I carefully cut the fabric to 30" and moments later realized I was supposed to cut it to 30½" to provide a seam allowance. D'oh! What's that saying about how often to measure, and how often to cut?
  2. The bag came out larger than needed. Having a prototype really makes that obvious.
  3. Even though the bag is 5" wide, it's crammed to access. I believe the fix for this would be to put the zipper on the long side of the bag. In a traditional bag, this changing from a top to side access zipper. But the whole point of this bag is that it can be carried either horizontally or vertically, so this doesn't really matter.
  4. I carefully placed and installed the grommets. And then most of them fell out while fiddling with the finished product. I'm not sure if it's my installation skills, the wrong choice of fabric or the wrong type of grommet for the task. But I know that before I try again, I'll be picking up a variety of grommets and doing test installations on different fabrics.

Even with all these lessons learned, the project was still a success. I had a chance to work on the fundamentals of measuring and using the sewing machine, and managed to make a creation in my head come to life. As for the grommet based attachment approach, the jury is still out on that. I'll have more hope for this design once I show that the grommets can be truly durable.

For now, REI need not worry that I'm going to put them out of business. But man, this sure is empowering and fun!