As we were chatting during dinner at the Miami airport I suddenly had a moment of absolute panic: where was my DSLR?! My mind raced. Had someone taken it off the back of my chair? Had I left it in a bathroom? And then it hit me: when we went through security, Shira had been randomly selected for additional screening. I had grabbed her and my carry-ons and must have left the camera at the security checkpoint. So off I rushed.
When I finally arrived at security, I encountered two jovial TSA agents who presented me with my camera and stood with me as I flipped through photos looking for shots of myself to "prove" the camera was mine.
It was a happy ending to a potentially very unhappy situation.
During those few minutes when my camera was lost I had one tiny bit of solace: I'd setup a backup strategy for my photos, so even if I had lost the camera, I wouldn't have lost a week's worth of pictures. Hey, it was at least one bright spot in another wise dark moment.
In the end, I didn't need the backups, but I certainly got one heck of a reminder of their importance. In the blink of an eye, cameras can be lost, stolen or otherwise destroyed.
While there are dedicated backup devices you can buy, I'm actually quite happy with my $18 solution. I actually used a variation on the method described below when traveling to Morocco, but during this last trip I definitely stepped it up a notch.
Here's the solution, which is built on the Android platform.
Step 1: Assemble the hardware and software. On the hardware side, you'll need an SD or Micro SD card reader for your phone. I use an older version of this one, however, the new version should work just as well. Note, I use Micro SD cards in my camera, so it only makes sense that I have a Micro SD card reader for my phone. On the software side, you'll need FolderSync. Once you've got a card reader, you can technically manually copy and paste files from your SD card to your phone. However, FolderSync can be easily setup to do all this copying for you.
Step 2: Configure FolderSync. My current photo shooting practice is as follows: when I need a telephoto lens, I grab my DSLR. When I need a wide angle lens, I opt to use my cell phone. The result is that photos are spread out between these two devices. And here's where I get clever: I copy all my DSLR photos to my phone, and all the phone photos to the DSLR. Sneaky, right? That way, if my phone is stolen (or dropped in a lake), I've got the pictures safely backed up to my DSLR's card, and vice versa.
I tend to shoot hundreds of photos a day, and even I can't fill up a 32GB card. So yeah, while carrying multiple cards or opting for a larger 64GB card may eventually be needed, for now I can do quite well with an $11 Micro SD card.
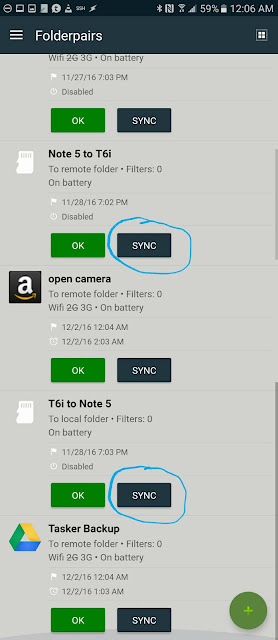
I setup two FolderSync 'folderpairs.' You need to make sure you've got the source and destination setup properly, but other than that, there's not much to it.


Step 3: Shoot away! Take them photos! Like I said, I shoot heavily with both my cell phone and DSLR depending on the subject.
Step 4: During a pause in the action, kick off the backup procedure. While driving between sites or at the end of the day, I'd plug in the Micro SD Card reader to my phone, pop the Micro SD Card from my DSLR into the reader, open up FolderSync and hit 'sync' next to each of the relevant profiles:

FolderSync would then churn away, making sure that any photos that needed to be copied over to the corresponding device had done so. Like I said, in the past I did this step manually, but no more! FolderSync is definitely the way to go.
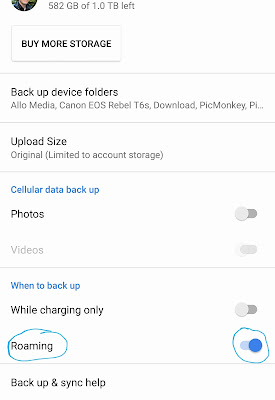
Step 5: find a WiFi connection and effortlessly push the photos to cloud. I use the Google Photos Android App, which has support for automatic photo backup. With a stable WiFi connection, and properly configured backup settings, the photos copied over in Step 4 are automatically pushed to the cloud; this includes the DSLR photos.
On our last trip, Google Photos refused to backup files for the first few days. That is, until I realized that there's a 'roaming' option that needed to be enabled:

At this point, every photo I've shot is now saved in three locations. But wait, for the truly cautious, there's more!
Step 6: Copy and conceal a master set of photos (optional). I don't actually do this step, however, part of me thinks I should. Here's what you do: purchase yet another Micro SD card and setup a FolderSync rule to copy all the photos from your phone (including those captured with your phone, and those backed up there from the DSLR) to this card. After you've performed the backup in Step 4, pop the DSLR's card out and plug in this master backup card. Kick off the sync.
Now that you've got the Micro SD card with all your pics on it, it's time to conceal it. It could live on your keychain easily enough. If you're feeling more like James Bond, you could always hide it in a hallowed out coin. If hand crafted leather is your thing, Etsy has you covered. Apparently, can even stash it in your sock. The point is, even when a thief (or your own ineptitude) manages to cause you to lose your bag / phone / camera, you'll still have your precious photos.
Take it from my hard earned lesson, the 15 minutes needed to setup this backup solution will pay dividends when you least expect it. Like say, when you're rushing through the Miami Airport...
No comments:
Post a Comment